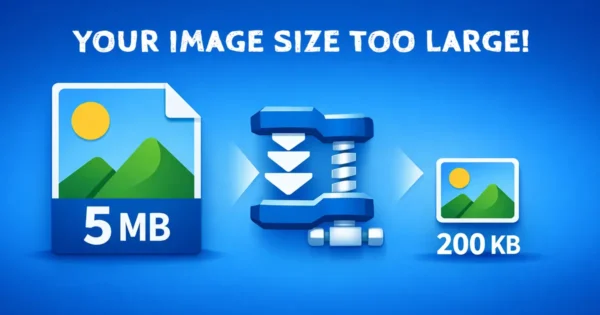
You are filling out an online form and it says: ‘Photo must be under 50KB.’ Your photo is 2MB. If you have ever searched for how to compress images without losing quality, you already know the problem – most tools either reduce the size badly or ruin the image in the process.
Or you are trying to send photos over WhatsApp or email, and the file is too large to attach. You just want a smaller version, fast.
That is exactly what the EzyToolz Image Compressor is built for. You set the target size – 20KB, 50KB, 100KB, whatever the form asks for — and the tool compresses your photo to fit. No software. No signup. Done in seconds.
What Does Compressing an Image Actually Do?
An image file contains a lot of data – colour information for every single pixel, metadata about the camera or device, and sometimes layers of information that are invisible to the eye. All of that adds up to a large file.
Compression removes the data you cannot see – the redundant colour values, the hidden metadata – and keeps everything that makes the image look good on screen. The result is a smaller file that looks nearly identical to the original.
| Without compression | After compression |
| 2.4 MB — rejected by portal | 48 KB — uploaded successfully |
Who Actually Uses an Image Compressor?
More people than you might think. Here are the most common situations:
- Students and job applicants: Government portals, college admission forms, and exam registrations almost always require photos under a specific KB limit – often 20KB, 50KB, or 100KB.
- Anyone submitting to government portals: Sites like DigiLocker, income tax portals, UIDAI, and state government forms regularly reject photos above 100KB.
- WhatsApp and email users: Sending a batch of photos? Compressing them first saves data, speeds up sending, and avoids attachment size limits.
- Website and blog owners: Large images slow down page load time. Google counts site speed as a ranking factor – smaller images mean faster pages.
Photographers and freelancers: Sending proofs to clients without giving away full-resolution files.
How to Compress Images Without Losing Quality – Step by Step
The EzyToolz Image Compressor lets you set the exact target size before uploading — which is what makes it different from most tools that just apply a fixed compression level.
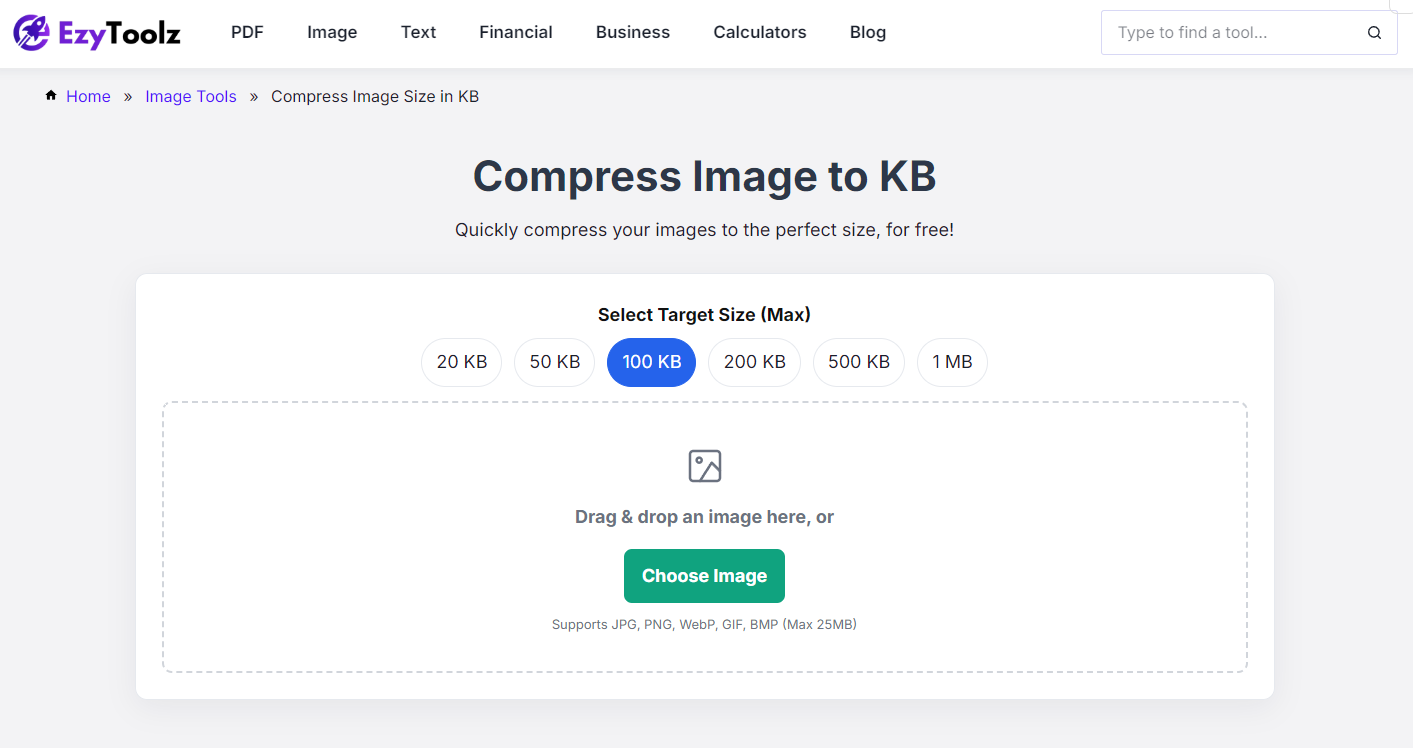
1. Set Your Target File Size
Before uploading anything, select the size you need:
20KB | 50KB | 100KB | 200KB | 500KB | 1MB
Check the form or portal you are submitting to — it will tell you the maximum size allowed. Use that as your target.
2. Upload Your Image
Click ‘Choose Image’ or drag and drop your photo into the upload area.
Supported formats: JPG, PNG, WebP, GIF Works on any device – phone, tablet, laptop.
3. Check the Preview
The tool instantly shows you the original file size alongside the compressed version.
You can see a quality preview before downloading — so you know exactly what you are getting. If the result looks good, move on. If not, try a slightly higher target size.
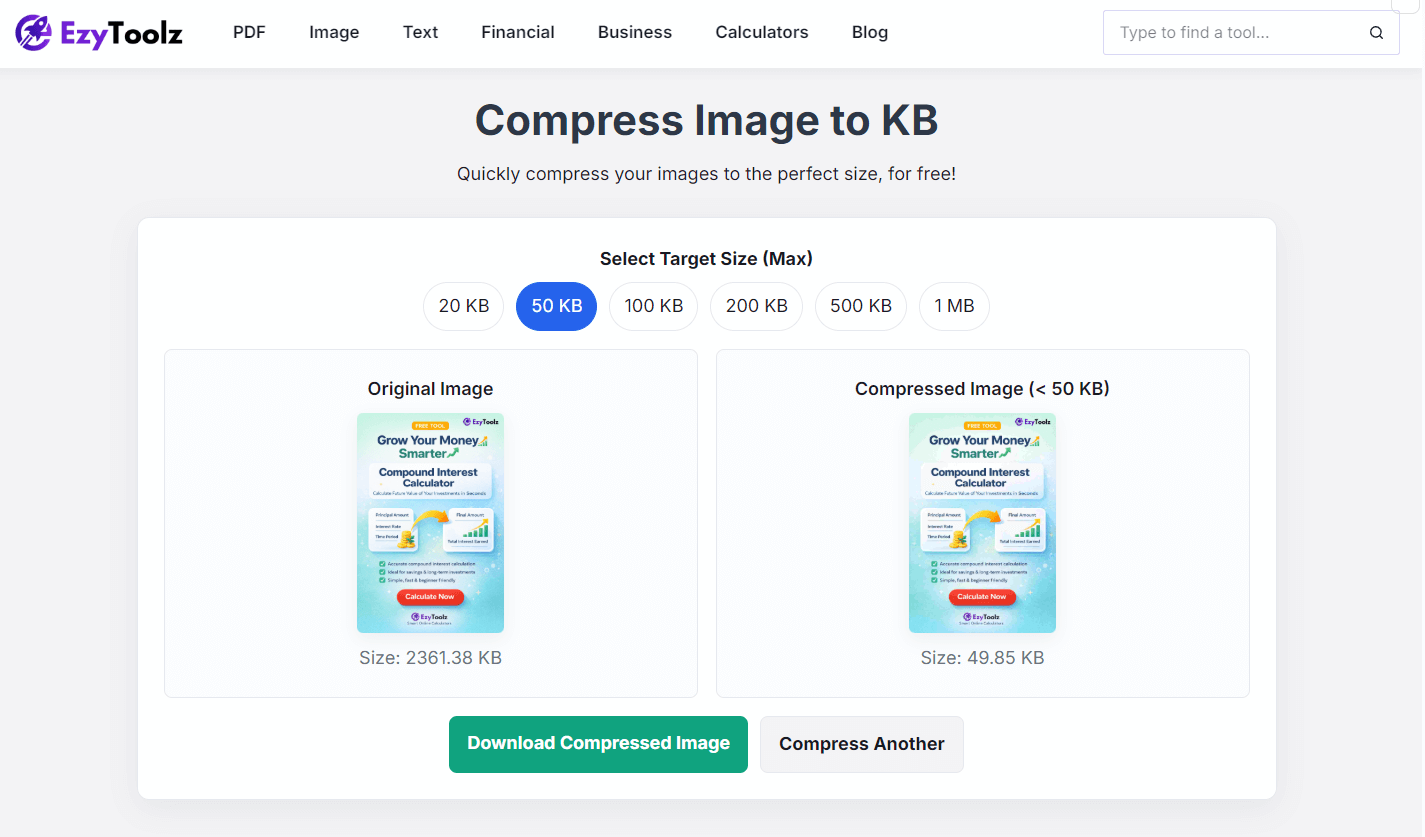
4. Download the Compressed Image
Click ‘Download Compressed Image’ to save the file to your device. Need to compress another photo? Click ‘Compress Another’ and start fresh.
This is how to compress images without losing quality — the preview shows you exactly what the output looks like before you download.
Always keep your original photo
Once you compress and save an image, you cannot get the original quality back from that file. Keep a copy of the original somewhere before compressing — it takes 5 seconds and saves a lot of trouble.
JPEG, PNG, or WebP — Which Format Should You Use?
The file format affects how much compression is possible. Here is a quick breakdown:
| Format | Best for | What to know |
| JPG / JPEG | Photos, passport images, real-world shots | Compresses very well. Small file size with good visual quality. Best choice for form uploads. |
| PNG | Logos, screenshots, graphics with text | Heavier than JPG. Supports transparent backgrounds. Harder to compress to very low KB. |
| WebP | Websites, blog images | Better compression than JPG and PNG. Not all portals accept it — check before using. |
For most government portals and form uploads, JPG is the right choice. It compresses cleanly and is accepted everywhere.
Learn more about image formats and compression from web.dev/uses-optimized-images (Google’s official guide)
Will Compression Ruin My Image Quality?
This is the most common concern – and the answer depends on how much you compress.
There are two types of compression:
- Lossless: Removes hidden data without changing any visible pixels. File size reduction is modest – maybe 10 to 30 percent.
- Lossy: Removes data that the human eye cannot detect. File size can drop by 70 to 90 percent. For photos on screen, the difference is usually invisible until you compress extremely aggressively.
For form uploads, WhatsApp, and email — lossy compression is perfectly fine. A photo compressed from 2MB to 50KB will look identical on screen to the original. The difference only shows up if you print it in very large format.
Compress to the limit, not below it
If the portal says 'under 100KB', compress to around 80-90KB — not 20KB. Heavier compression means more quality loss than necessary. Use the minimum compression that gets you under the limit.
Frequently Asked Questions
How do I compress an image to exactly 20KB or 50KB?
Open EzyToolz Image Compressor at ezytoolz.com/image/compress-image-size-in-kb/, select 20KB or 50KB as your target size before uploading, then upload your photo. The tool will compress it to fit within that limit. If the image is very high resolution, it may need to go to 50KB instead – very small KB targets are not always achievable without significant quality loss.
Does compressing an image reduce its dimensions (width and height)?
Not necessarily. Compression primarily reduces the file size by removing invisible data. Dimensions may change slightly depending on how aggressively the image needs to be compressed to hit your target. If you specifically need to resize dimensions, use the EzyToolz Image Resizer instead.
Can I compress a PNG to under 100KB?
Yes, but PNG files are harder to compress than JPGs because of how the format stores data. If your PNG is very large and you need it under 100KB, the tool will do its best. Converting it to JPG first usually gives a better result for photo-based images.
Is my image uploaded to a server when I compress it?
The EzyToolz Image Compressor processes your file in your browser — your image does not leave your device. No server upload, no storage, no privacy concern.
Can I compress multiple images at once?
The current tool processes one image at a time. For bulk compression needs, you can open multiple tabs or use the ‘Compress Another’ button to process them one after the other quickly.
Why does my compressed image still look rejected by the portal?
Some portals check both file size AND image dimensions. If your photo is very large (e.g. 4000 x 3000 pixels), the portal may reject it even if the file size is correct. Try resizing the dimensions first using EzyToolz Image Resizer, then compress.
The Right Tool for the Right Size
Most image compressors give you a slider or a quality percentage – and then you guess. EzyToolz lets you type in the exact KB you need and compresses to fit. That is the difference between a tool built for real use cases and one built for generic purposes. Whether it is a passport photo for a portal, a batch of photos for email, or images for your website – the EzyToolz Image Compressor gets you there without installing anything or signing up for anything.
That is what makes this approach to compressing images without losing quality different from a generic slider tool.